Archive for 2015

Back to School- Tips and Tricks

Monday, August 3, 2015

With well over a month left before I officially meet my new batch of kinders, I am practically in full-on school mode!  Welllll, that's probably partially because I am immersed in the incredible Writing Institute professional development at Teachers College this week.  Seriously, one day in and I am HOOKED.  Lucy Calkins is like the human embodiment of teacher wine, chocolate, and pizza all rolled into one.  She is a spellbinding speaker.  I took 7 (!) pages of anecdotal notes today so, fret not, I will be sharing more on that next week!


ANYWAY, back to BACK TO SCHOOL!  I wanted to share a little bit of my Back to School FUN and organizational tips.  Here goes...

A small little something for your colleagues and administrative assistants or administrator!  Fill a mini glass jar (or baby food jar if you have those handy!) with some sweet treats (M&Ms for the Marvelous and Magical tag, Lifesavers for the lifesaver tag, and your favorite candy for the 'sweet' tag) then print these gift tags and attach with a ribbon! 


 I always like to give something a little practical and "teacher-y" to my new Assistant Teacher.  Last year I gave a super cute mini clipboard to my new AT.  I am SO psyched about the girl I am working with this year, I will have to find her something special! 
Now for the kiddos! 
About a week before school starts I send out the beloved jitter glitter! So the glitters doesn't make a huge mess on the floor where the letter is opened (great way to kick off the year with the moms- NOT!) I put the glitter in a little baggie.  
Here is a version I sent out a few years ago... 


Here is the template that you can purchase as part of my Back to School/End of Year Organization + FUN!
In addition to the jitter glitter, I also send my welcome letter.  You can snatch it up for grades K-5 here

  For our Orientation Day, I like to give the kiddos a little treat to enjoy after their first day.  Here was last year's snickety snack.  


This year I am going to give the kinders some bubbles to take out to recess the first day.  I don't have these prepped yet (I still have a month to go!) but here is the template I am using for the tag!

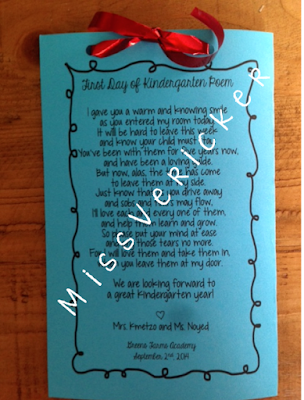
I don't like to leave the parents out, so I put these adorable little poems on a wire or plastic picture frame holder and give it to them as a little memento of our upcoming year. 

 I make sure to leave these poems right next to my super important parent contact sheet.  Yes, the office gives me a copy of all this info but I like to have it all right there in each parent's handwriting at my fingertips for when I need it quickly! 


At the end of the year I send my kiddos and parents home with these tear-jerkers, also included in the pack! 

 A little more organizational helper.... my teal, pink and green themed classroom labels. So I, or anyone else who may enter my room, knows exactly where everything is!


 All of these goodies are available for kindergarten through fifth grade in my TPT Store.  There is so much more goodness for back to school/end of year in there- be sure to check it out and HURRY! it's on sale through tomorrow.  All this for only $5.20!


Add a comment »

Mealtime Monday Roasted Onion, Tomato, and Garlic Dipping Sauce + leftovers!

Awl-riiiight, this one isn't exactly speedy, but it's so delicious I had to forgo the "speedy" factor for the taste factor.  Once you get some minimal prep out of the way, you get 120 minutes of FREEEEE time while the veggies roast.  Woo hoo.  Grab a magazine, check parent emails, orrrr write another blog post to link up below!

Okay, for starters, preheat the oven to a low 275 degrees. {Alternatively, you could roast these on 375 for much, much less time (30-45 minutes) but  I just love the slow and low roasting!}


Chop, chop, chop a tomato (1 large or 3 small) and red onion into large chunks.  Throw them in a bowl and toss with a generous pour of olive oil, Italian seasoning, salt and pepper.


Spread the veggies out on a foil-lined baking sheet.  Throw a few cloves of unpeeled garlic on the sheet for a little garlicky goodness.  
Throw these babies in the oven for 90 minutes- 2 hours. 

Take them out and let them cool for a few minutes before putting them in your food processor. 


Pulse these up to you desired "doneness."  

Sometimes I like it a little chunkier if I know I will be using these as a savory dipping sauce or topping for some delicious bread toasts, or I make it super blended and pour it over chicken cutlets or ladle it generously into pasta.  Yummy leftovers! 

Monday Night!


Tuesday Night!

Ingredients:
1 large or 3 small tomatoes 
1 large red onion
3-4 unpeeled garlic cloves
Italian seasoning (are you sensing a trend here with my recipes?!)
olive oil
salt and black pepper

What have you been whippin' up in the kitchen these days?!  Link up below!


    An InLinkz Link-up
   

Add a comment »

Mealtime Monday: Arugula, Proscuitto, Fig and Cheese Flatbread

Monday, July 27, 2015

Oh boy!  Even writing this post is making me want to go back and bake a second, okay, third  flatbread.  This is my all-time favorite quick, easy and DELICIOUS meal.  The whole thing takes 20 minutes from start to savoring the very last bite.  Perfect for that 'Let's-Get-into-the-Friday-Vibe-Crack-Open-Your-White-Wine' Thursday night meal.  Let's get cookin'!


Preheat the oven to 475 degrees.


Take a bag of pre-made store-bought dough and cut it into the correct portion then flour and stretch/roll it out.
{HINT: When I am devouring this solo, I usually cut the dough into quarters.  If my husband and I are eating this, I use thirds or half of the dough depending on our starvation level.}
Use a generous portion of olive oil on a foil-lined baking sheet.  Spread the dough out as thin as possible on the sheet.


 Drizzle a little olive oil on the top of the dough so it doesn't dry out.  For an extra flavor kick, sprinkle some Italian seasoning and cracked pepper on top of the uncooked dough.

Into the oven for 8-10 minutes depending on the thickness of your dough.  You want to take it out when the bottom of the dough is nice and golden brown.

Allow the cooked flatbread to cool momentarily before spreading fig preserves/jam over  the top.


Tear pieces of proscuitto and your favorite cheese spread out on top of the flatbread and fig.  I loooove me some goat cheese crumbles, my husband prefers shaved parmesan.  If neither goat cheese nor shaved parmesan are available blue or gorgonzola cheese crumbles work as well.  Also, if there is no proscuitto or it's not your thing, use some good ol', beloved BACON!


Lastly, lightly dress a few handfuls of delicious, peppery arugula with balsamic dressing.  I love, love, LOVE TesseMae's balsamic vinaigrette but any balsamic dressing will do.  Generously spread the arugula over the finished flatbread and VOILA!  Buon Appetite!


Ingredients:
store bough pizza dough
fig preserves (alternatively you can use peach jam)
your favorite cheese (goat/blue/gorgonzola crumbles or shaved parmesan) 
arugula 
proscuitto (or BACON!)
optional: Italian seasoning or cracked black pepper

What's  cookin' with you?!  Link up below!


Add a comment »

EOY Writing Follow Up

Wednesday, June 3, 2015


The calm AFTER the storm.... a beautiful thing!  I officially finished my FIRST year of KINDERGARTEN yesterday!  Cue both fireworks and sobs simultaneously.  Loved the kiddos,  parents, curriculum, colleagues- e v e r y t h i n g!  I just hate that its over.  I had this surreal moment while I was hugging them goodbye yesterday, like "oh, wait, you won't be in this room again next year."  I think last year's good-bye was so super emotional because I was leaving the school that this year seemed like a no-brainer until they were actually physically leaving my room and I wanted to scream "WAIIIIITTTT,  don't go! Come back!!"


(Reading. At first I couldn't do it, then but then I tried again and it worked 
and now I am reading hard words. )

Anyway, enough of the sappy- here's something that actually might be of use to you over the next few days...  You can read about my post from last year here.  Here is the updated K version of this activity :)

To tie my shoes (a common theme!). And make new friends. And to meet my teachers.


Make friends and learning math 


and my personal favorite, 
tying my shoes, reading, learning alphabet, learning math 

Sorry for the crummy pictures, my focus was more the on littles rather than taking aesthetically pleasing photos!  Snag the FREEBIE here.

ps- There is also a writing page for, " KID, YOU'LL MOVE MOUNTAINS!"

Add a comment »

EOY Gifts for Retiring Colleague or Administrator

Wednesday, May 27, 2015


Yoo hoo!  Remember me?! I'd love just ONCE this year to not begin a post like that.  Between starting a NEW job at a NEW school this year plus a whole lot going on in my personal life (got dad's blood work back yesterday- 3 months post chemo and so far so good! Keep up the prayers!), it's been nuts trying to maintain blogging.  I pinky promise next year I will be better ;)  Hopefully you've been keeping up with me on instagram.

ANYWAY,  I got a pretty significant response to this post on instagram and wanted to share about it in the hopes it will help some of my friends out there in the world wide web...   Our Head of LS is retiring after 15 years this year and while I've only known her a few short months, I wanted to do something special to commemorate her and leave her with lasting memories of all of us.  I know one of my favorite bachelorette activities is to stock the bride with tons of vino!  I piggy-backed off that idea to create a school-themed gift from us faculty.


Each faculty member selected a school event that our Head will either be surely missed at... or glad to be missing!  Back to School Night, Spring Concert, PT Conferences, Field Day, whatever events are "special" at your school.   My colleagues wrote down a little message to be put on the bottle and emailed it to me.  Then the fun stuff came... 4+ hours of making these customized labels (the weekend before reports were due! What was I thinking?!).  On that day, she pops open that bottle, reads the message and thinks warm and fuzzies about all of us.  ;) 


For those who can't look at this and see exactly what I did... I made these in PowerPoint using Kayla's ADORABLE  honeycomb paper and Graphics from the Pond's frames.  Presto customized wine labels.    Don't have time for all that?  Not to worry, HERE is your own EDITABLE version.  Save time! I already put in 5 hours so you don't have to.  


I then printed the PowerPoint slides onto sheet sized labels and cut them out and attached them to the back of the wine bottles.  And by me, I mean all of my colleagues (LOVE them!!) came over for a little cutting and sticking party in my room.  Too bad we couldn't drink any of the wine.... 
HINT: Use the back so that your giftee can see what kind of wine it is!  


(don't mind this one, it was my first label and I didn't have good attaching skills!) 

The tubs I used to hold the wine were from Party City and cost around $8 a tub.  As you can see, this is a relatively affordable, super cute end of year/retiring gift for someone special at school!   See more gift ideas in my last post below (eeek! it's my holiday gift idea post!) 

PS- check back next week for photos of how I wrapped these up all pretty with a bow and cellophane.  Too exhausted to take pics today after carrying them into hiding away from the kiddos! Wine+kindergartners=NO BUENO!

PPS- if you are interested in having these custom labels, here ya go!


2 Comments »