A Peek at September Centers

Tuesday, September 23, 2014

Here is a little looksie at what we have been up to in Kindergarten this week...

This week's theme is LETTERS with the beloved anchor text, Chicka Chicka Boom Boom by Bill Martin.  We sampled a few delicious alphabet cookies from Trader Joe's, sang the campfire tune "I Said a Boom Chicka Boom" (mousey style is our  fave!) and worked on some of the following centers...  (disclaimer- they are NOT cute centers, but they are getting the job done)

Chicka Chicka Stamp and Color 


We colored in the palm tree then stamped out the letters of our names with large alphabet stamps and scented ink pads.  We were not sure if all of our friends' names would fit on the sheet which begged the question... Chicka Chicka Boom Boom, will there be enough room? 
ps- you should see the "after" picks of my room.  It looks like 5 stamp pads EXPLODED all over the tables, chairs, FLOOR, oh yeah, and their  faces and hands.  Ahhhh!  

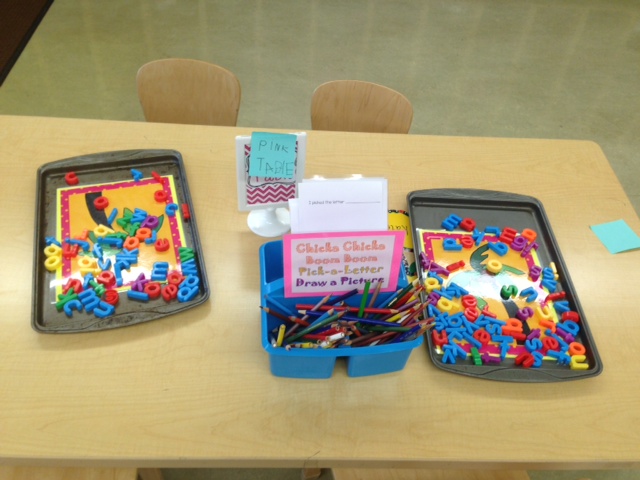
Chicka Chicka Boom Boom Pick-a-Letter, Draw-A-Picture


Pretty self-explanatory... Pick a letter off the sheet pan and then write the letter on the sheet and draw a picture of something that begins with that letter.  

Fine Motor Lacing Center


I love the simplicity of these- no prep and helps build those fine motor skills!  I put out a box of lacing/sewing cards and a pile of laces and ta-dah!  Simple center!

Math Match


 We use Singapore Math and our focus this week is the number '3' and the concept of "the same" and "matching".  Easy peasy matching center.  Students work in pairs; one picks three pattern blocks and arranges them on his/her half of the Math Mat.  Then, the other must match the design the first student created on his/her side of the mat. Then they switch! 


I will be back soon to post about last week's apple centers and projects and next week's name centers!  Have a great week!  
PS- anyone interested in the basic templates as freebies on TPT?  Comment below and I will post them this weekend! 


Add a comment »

Bright Ideas: Velcro- a LIFESAVER!

Sunday, September 21, 2014

Somehow I always seem to miss the BRIGHT IDEAS link up party :(  Well, even though I can't be party of this wonderfully helpful linky, I'd still like to share my Bright Idea with you!


Okay... my bright idea is insanely simple, cheap and effective- what more could a teacher want?!  We all have that student (or five!) who never has a pencil.  Every activity becomes delayed by 3 minutes because there is a mad dash to the pencil bin or asking 14 other classmates for a spare pencil.  UGH.SO.ANNOYING. I came up with a simple solution:  stick one side of a Velcro dot/square to the desk and wrap the other side around a pencil! 

When the student is done using his/her pencil they just stick it back on the desk Velcro dot.  TA-DAH!  Problem solved.  I usually put two Velcro dots on either side of my kiddo's desk and then give him/her four or five pencils with Velcro dots on them.  I swear, it has never been an issue again once they get the Velcro dots.  


PS- I also did this for one of my littles this year with his pencil case.  It fell off his desk at least six times a day.  No joke.  I slapped 6 Velcro dots on the bottom of his pencil case and match up six to his desk and bye-bye to scrambled pencil cases on the floor! 

Hope these {simple} ideas help you!  What are your BRIGHT ideas?!  Comment  a link to your post below! 

Add a comment »

Reading Snapshot: Daily Five!

Sunday, September 14, 2014


It's been awhile since I have done a Reading Snapshot but I wanted to post this before it becomes a distant memory.  As most of you know, I switched not only schools, but grade levels as well! I can now happily say #iteachk :)  This post is a bit of a throwback from when I taught first grade and I hope to use a modified version of my system later on in the year with my new kinders.  


This is the board that was at the front of my meeting area.  When introducing the D5 at the beginning of the year (through almost Thanksgiving!), we would focus on only one or two areas at a time.  This picture shows us about three weeks in when we had established our stamina for Read to Self and were working on building our stamina for Read to Someone.   We kept the "Read to Self I Chart" up as a reminder and also the stamina building graph for Read to Someone. 


These two photos are of my actual set up which dictated most of the system I had developed in my classroom.  Each leveled group in my class had a color.  The students would keep their materials (folder, notebook, and what books we were currently reading) in the bin.  The vertical shelf was tucked into the corner of my classroom library and hosted bins of "comfortable" books (Mo Willems, Dr. Seuss, Read Alouds, Chapter Books), paper for Word Work or Work on Writing, pencil cases, highlighters, crayons, and magnetic letters/magnetic whiteboards. This way everything the students needed was easily accessible, and more importantly, did not involve them needing me to stop what I was working on to get it or assist them.  


These little desks were pure MAGIC for my D5 set up.  The students pulled them out and could work independently on them for Work Work (picture 1) and Work on Writing (picture 2).   


I kept the materials that I used for the Word Work in these little containers.  Since I needed them to be totally independent I used my Wiki/Playdoh Sight Words and Letters Pack to keep the routines consistent.  They also loved the hands-on, tactile aspect of the activities. 

Each week we learned 6 new sight words, so I would put the new laminated word cards in the bin along with the record sheet, Wiki Stix,  Playdoh and letter stamps (they were a constant in the bins).  We would also keep some of the previous weeks' cards in there for review and practice as well.  


Now for the nitty-gritty, see if you can follow me... I am fortunate enough to have always had an Assistant Teacher in my classroom.  My literacy block was 60 minutes, so this model was based on 3 concurrently running stations, each station lasted 20 minutes.  Station One was teacher led small group phonics instruction,  Station Two was small group guided reading, and Station Three was independent Daily Five work.  My students would circulate amongst all three stations during the 60 minutes in their leveled group.  I would switch on and off with my AT on who would teach guided reading/phonics each week depending on what the kiddos needed.  The D5 Station always stayed the same.  Since we only had 60 minutes, 40 of which were spent with a teacher, I adjusted D5 a little; each day the students chose ONE option and stuck with that for the full 20 minutes.  


Students working at my group doing guided reading with our WhisperMaPhones.  You can read more about this post here.  


And some small group phonics work. 

Now, while Station One and Two are teacher led Station Three, aka D5, is completely and utterly independent!  And that takes PRACTICE, PRACTICE, PRACTICE!  I usually started introducing the modeling behaviors and stamina builders of Read to Self the second week of school, Read to Someone mid-third week, and practice those through week four.  Week five was Word Work because at that point we had accumulated enough of a sight word vocabulary to work independently  for 20 minutes.  

I would sit at my kidney table, my AT would be at a group of desks, and the D5 would be independently working in my library.  They could either Read to Self/Read to Someone on the bean bag chairs or take one of the mini lap desks and work on Word Work, Writing, or grab an iPad and Listen to Reading.  


Practice makes perfect!!! 

I know the main premise of the Daily Five is student choice.  We discussed how each day the students could choose whatever they wanted, but they could only do each option ONCE per week.   This way I ensure they were hitting each of the goals and not just always choosing the two most popular, Read to Someone and Word Work.  To help keep them on track I created this checklist.  It is a FREEBIE in my TpT Store.  Woo hoo! 


And, of course, since it was first grade and we always had a huge continuum of readers, our hallmark reading rule was.... 


And there you have it!  I miss my D5 routines but am super excited to implement these in a meaningful, developmentally appropriate way in Kindergarten later on in the year.  

Up next, how I organize my READNG BINDERS/planned for three simultaneous reading groups phonics, guided reading and Daily 5 activities each week.   


Add a comment »

My Whisper-Ma-Phone

Saturday, September 13, 2014


Then he grunts, "I will call you by Whisper-ma-Phone" 
for the secrets I tell you are for your ears alone
Down slupps the Whisper-ma-Phone to your ear
and the old Once-ler's whispers are not very clear,
since they have to come down
through a snergelly hose
and he sounds as if he had smallish bees up his nose 

-The Lorax


Last year, I ordered the WhisperPhone Select for my reading groups in the hopes to create more meaningful guided reading group activities.  At times it can seem quite repetitive or boring to just take turns reading aloud over and over and over again.   We have affectionately dubbed the WhisperPhone our "Whisper-ma-Phone" after the contraption the Once-ler uses in The Lorax.   It does have seven hoses but they are not "snergelly" in the least and I certainly hope I do not sound as though I have "smallish bees up my nose" when I speak through the phone! 


I use the Whisper-ma-Phone in two ways- Free Choice or Teacher's Choice.   For 'Free Choice' I put out bins of leveled books at the children's appropriate reading level.  Each child can choose his/her own book and read at his/her individual pace.  Since I am "keyed" in to each child, I simply turn the center dial to face the child I would like to listen to.  This creates a private two-way communication between that student and I.  I can ask them questions, listen to their fluency, or whisper praises or encouragement in their little ears.  


The second option is "Teacher's Choice" in which we all read one book together.  There is an option on the Whisper-ma-Phone that allows everyone to conference in together.  I typically do not use this option as it can get a little confusing with five or six children all listening to each other read at once!  I still will conference in with each child individually as I do with the "Free Choice" option, but I also am holding the book to read along, so I can provide more direct guidance or help if necessary.  I use this option more when we are increasing the difficulty levels of the texts so the students have more support.  


The little readers love the Whisper-ma-Phone.  The individual phone they hold to their ear allows them to hear themselves reading.  It is excellent for fluency practice and they love, love, love to hear themselves read! The hoses also expand out quite far so the littles can spread out and choose their own spot.  A lot of times they choose to sit in their cubbies and read from there while I sit at my horseshoe table and listen in.  


The Whisper-ma-Phone has been a huge hit in my classroom.  I try to use it at least once a month for some "down" time in reading.  The most IMPORTANT part of the Whisper-ma-Phone....

CLEANING IT!!! I give each child a sani-wipe after we finish a session and tell them to scrub, scrub, scrub! :) 


I also keep a few individual Whisper-ma-Phones in my Daily Five area for "Read to Self".  I find these help to keep the little readers focused and less distracted by  fellow "Read to Self"-ers in their area.  Of course, the bean bag chairs don't hurt!  I will do a more detailed post on how I run my D5 activities later on! :)


1 Comment »

Techie Talk- Makey Makey and SCRATCH

Saturday, August 23, 2014

Dusting off my dear old blogger.com site and finally sitting down to post!  I have a million ideas running around in my head of great blog posts {classroom reveal, my old Daily 5 routines, some 'bright ideas', reading binders, the list goes on and on} but before this idea turns into one of those "To Write" posts I wanted to share about a super cool technology/STEM activity I participated in yesterday.

I am finally starting out at my *new* school this week {and literally cannot contain my excitement!}.  Anyway, during our first two days of orientation our technology guy, Josh, decided to flip our usual tech training on its head.  Rather than walking us through usual steps of how to set up email and blah, blah, blah; he actually gave us the techie toys our kiddos use for us to play around with and experiment.  Much more interactive and, in my case, quite humbling.


We started off using Animationish {animation software} which was fun to play around with and brought me right back down to earth with the reality of my artistic skills.  This is definitely something to check out for your little cartoonists.   I felt my brain going into overdrive thinking of possible literacy/writing connections.  Animate a short story, write/read sight words then make them move {or for my new kinders, letter identification/recognition).  Definitely check it out!

Next up was ... (drumroll, please...) creating a musical instrument using Makey Makey  and Scratch. Once again, my artistic skills were feeble at best, but nonetheless, it was an awesome, awesome experience.  Here goes...


In my very primitive knowledge based off of yesterday's experiment, a Makey Makey  is basically a tech tool that allows you to essentially turn anything (that can conduct electricity) into a touch sensitive control panel- create sounds, movement, or utilize any object as a joystick or game controller.  The options are truly limitless.  Watch a video on what I am trying to explain here.

For Josh's demo he hooked the Makey Makey wires (alligator clips) up to balls of playdoh and when he pressed them, they played sounds! Yes- playdoh played actual music when tapped! While I was too intrigued at the moment to whip out my phone and take a video, I found a similar video on youtube that demonstrates what I am trying to inarticulately explain.  He had programmed this using Scratch software.  What does that mean?????

Josh took the balls of playdoh and hooked the alligator clips and wires onto the playdoh.  The other end of the clip was attached to the master keyboard.

Using the Scratch software he controlled what he wanted the playdoh to do when touched, in this case, it played the sound of a piano.


Then he Beethoven-ed himself away!

For my instrument, I cut a piece of cardboard into a large trapezoid shape and sectioned it off into strips.  I then took copper tape (an excellent conductor, tin foil would have worked too) and attached a piece to each strip. I then programmed each strip to correspond with a different sound using the Scratch software.


 Lastly, I painted each strip a shade of pink.  The largest strip was the darkest and the smallest was the lightest.

The way I programmed my Makey Makey was to make the darkest strip the loudest and the smallest and lightest strip the softest.  I could envision doing a cross-curricular lesson on art, sound, and size.  The darker a color, the more intense it is, hence a louder sound.  As you add white, it becomes softer and lighter.


I would love to do an activity were the students make letters out of playdoh or wikistix and then record the sound the letter makes.  They could then travel around the classroom to each others' letters and say the sound of said letter.  To check if they were correct or not, at the end they could hit the letter and hear the correct sound!

Anyone else ever use Scratch or Makey Makey?  Let's share ideas!  Comment below :)

I am super excited to be working with Josh this year and look forward to sharing more intriguing techie toys with you!


Add a comment »

Back To School 2014: Bulletin Boards

Monday, July 21, 2014

Oh, hi there, remember me?  Miss Vericker's Adventures? Yeah, it's been AWHILE!  I have been splitting my time between New York (work, work, work on the new classroom and K activities!) and Rhode Island (beach, beach, beach) with a few weddings, family reunions, and bachelorette parties sprinkled in between.

Anyway, I am currently packing to ship off to Europe with my husband for two weeks, but before I go I wanted to do a blog post about a Back To School tip that is a lifesaver- felt or fabric bulletin boards!  WOO HOO!

Below is a photo of my  trusty Back To School bulletin board that was a cinch to just tack up the cut-outs and VOILA... bulletin board complete!  No fussing with rolls of paper and staples and the inevitable rips or fading.  {On this board, I used a wide grosgrain ribbon as a border}


If you are going to mess with fadeless paper over and over again, year after year- why bother?!  It is just as easy to head to your local Michael's, Joann's or another favorite craft store and purchase a few yards of felt.  For me, the felt was VERY cost-effective- approximately $4-$9 a yard, very comparable to rolls of fadeless paper.  This is a one-time purchase that will last for years to come.  Another slightly pricier option is to use neoprene fabric (think bathing suit or gymnastic leopard fabric), which looks super cool and has a little more "give".


I fell in love with the vibrant colors of the felt and how they did not fade over the three years I had them up in my classroom.  I also got a little snazzy with glitter felt, that also surprisingly, did not lose its sparkle.  What teacher doesn't love a little glitter in her life?! As you can see from the photo above, I have some oddly shaped bulletin boards which were a real gem to try to cover.  Thank goodness I only had to do it once!


I found that a yard of felt was the perfect size for the width of most of the bulletin boards.  Just like with any bulletin board creation, it definitely is a labor of love putting these up.  I found what worked best was to first use push pins before I inserted any staples.  This was you can keep pulling and stretching the fabric until it is taut.  Below are some works in progress.


Once you have the fabric stretched, pulled and wrinkle-free, throw some staples and a border or two on there and TAH-DAH!  Your forever bulletin boards are complete.  Never again will you be spending hot August days sweating your behind off putting up bulletin boards.  PS- I always found that regular old standard staples did the trick but some of my colleagues used a staple gun; either way you're fine.


And here are a few pics of my Word Wall which was not made with fabric, rather I laminated construction paper and used velcro dots as I added each word.  


Below is what I did with my leveled library.  Each bin was labeled using D-rings.  To make the boring shelves POP I laminated the large sheets of construction paper and taped them to the back of the shelves.  Alternately, I am sure my precious felt would work as well, it was just too hard for me to reach the back wall to staple so I decided on paper and tape.


Last, but not least, my meeting area was framed on one side by my classroom blocks.  Now, I don't know about your firsties, but my could not keep their little paws off of the blocks during learning time!  Simple solution- curtains!  I bought some inexpensive, colorful curtains from Target and a tension rod and problem solved!  PS- I had to carve a little 'C' shaped hole out of the shelves at the top of the block shelf so the tension rod would easily fit.  I eventually hemmed these so they were nice and flat and did not drag along my carpet.


PPS- sorry for the horrible "aesthetic" of these photos!  They were all taken three years ago in my old classroom before I became good at taking visually appealing pictures of classroom decor!  


1 Comment »