EOY Gifts for Retiring Colleague or Administrator

Wednesday, May 27, 2015


Yoo hoo!  Remember me?! I'd love just ONCE this year to not begin a post like that.  Between starting a NEW job at a NEW school this year plus a whole lot going on in my personal life (got dad's blood work back yesterday- 3 months post chemo and so far so good! Keep up the prayers!), it's been nuts trying to maintain blogging.  I pinky promise next year I will be better ;)  Hopefully you've been keeping up with me on instagram.

ANYWAY,  I got a pretty significant response to this post on instagram and wanted to share about it in the hopes it will help some of my friends out there in the world wide web...   Our Head of LS is retiring after 15 years this year and while I've only known her a few short months, I wanted to do something special to commemorate her and leave her with lasting memories of all of us.  I know one of my favorite bachelorette activities is to stock the bride with tons of vino!  I piggy-backed off that idea to create a school-themed gift from us faculty.


Each faculty member selected a school event that our Head will either be surely missed at... or glad to be missing!  Back to School Night, Spring Concert, PT Conferences, Field Day, whatever events are "special" at your school.   My colleagues wrote down a little message to be put on the bottle and emailed it to me.  Then the fun stuff came... 4+ hours of making these customized labels (the weekend before reports were due! What was I thinking?!).  On that day, she pops open that bottle, reads the message and thinks warm and fuzzies about all of us.  ;) 


For those who can't look at this and see exactly what I did... I made these in PowerPoint using Kayla's ADORABLE  honeycomb paper and Graphics from the Pond's frames.  Presto customized wine labels.    Don't have time for all that?  Not to worry, HERE is your own EDITABLE version.  Save time! I already put in 5 hours so you don't have to.  


I then printed the PowerPoint slides onto sheet sized labels and cut them out and attached them to the back of the wine bottles.  And by me, I mean all of my colleagues (LOVE them!!) came over for a little cutting and sticking party in my room.  Too bad we couldn't drink any of the wine.... 
HINT: Use the back so that your giftee can see what kind of wine it is!  


(don't mind this one, it was my first label and I didn't have good attaching skills!) 

The tubs I used to hold the wine were from Party City and cost around $8 a tub.  As you can see, this is a relatively affordable, super cute end of year/retiring gift for someone special at school!   See more gift ideas in my last post below (eeek! it's my holiday gift idea post!) 

PS- check back next week for photos of how I wrapped these up all pretty with a bow and cellophane.  Too exhausted to take pics today after carrying them into hiding away from the kiddos! Wine+kindergartners=NO BUENO!

PPS- if you are interested in having these custom labels, here ya go!


2 Comments »

HOLIDAY GIFT GUIDE!

Tuesday, December 16, 2014

HO! HO! HO!  IT'S THE MOST WONDERFUL TIME OF THE YEAR! 

 It sure is!  I know it sounds cliche, but I genuinely DO get more happiness out of giving a well-thoughtout, heartfelt gift rather than getting presents.  To be honest, part of that is probably because gone are the days of mile-long, color-coded lists which would magically make their way to the North Pole and then be artfully placed under my tree on Christmas morning.  Now, my husband and I prefer to get each other something special for our apartment i.e. a new rug or coffee- woo hoo!  I always try to take the time to consider each person on my "nice list" and find a little something special for them. Now, we all are teachers here so I am not looking to break the bank.  I try to keep all my gifts under $20.  Here is the rundown this year. 

For my colleagues dear friends this year, I got them monogrammed clipboards or mugs from Personalization Mall.  Typically the clipboards run close to $40 but I snagged them during the Black Friday/Cyber Monday sales and with shipping each clipboard came to about $20.  SCORE!  The mugs were a steal at around $12 a piece.  I mixed and matched colors depending on what I thought each lady would like. 


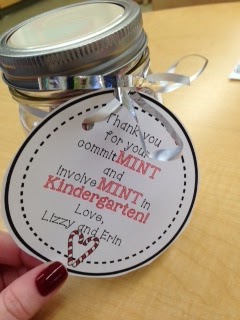
Next up was my parent volunteers.  I picked up some ever-handy mason jars at Michaels Crafts and filled them with Candy Cane Hershey Kisses.  Throw a cute little gift tag on there and you're ready to go! 


For the kiddos... a no-brainer! Snowman soup!  I used all store-brand items to cut down on costs. Individual hot cocoa mix, a handful of marshmallows, mini candy cane, and some hershey kisses to seal the deal.  


And, of course, for the students' families... such a beautiful, sweet gift- paperwhites.  We got ours at a local gardening store but you can order some here.  Have the littles bring in a mason jar or a pickle jar and fill the bottom with rocks for a beautiful aesthetic, or just dirt to keep it simple.  The pictures below are after 7 days of growth.  I hot glue-gunned a silk white ribbon around the jar and printed this sweet little poem for the students to decorate.  


For a class gift... HO HO HANGMAN!, Snowman Hangman, or a little sight word fun with I SPY Christmas and Winter games.  

Happy "shopping!" Merry Christmas! and  HAPPY HOLIDAYS.  


Add a comment »

Pumpkin Week!

Monday, November 3, 2014

From apples to.... PUMPKINS!  October is my favorite month of the year, who doesn't love filling their house and classroom (okay, and mouth, too! hello, PSLs from Starbucks!) with the beautiful orange pumpkins and decorative squash.  Here is a look at some of what went on in KK during our two week pumpkin theme...

We kicked off our theme study with a trip to the local pumpkin patch on Wednesday.  After one rainy tractor ride and a walk through the corn maze we each picked out a pumpkin.  For the next two days, we explored the OUTSIDE of our pumpkins...

    
On Thursday and Friday, we talked about the ribs of a pumpkin and estimated how many ribs we thought our pumpkin had.  We also used unifix cubes to estimate the height of our pumpkin.  Lastly, we weighed our pumpkin using a good old fashioned food scale.   

Using the precious, time-honored book, Pumpkin, Pumpkin by Jeanne Titherington we discussed the lifecycle of the pumpkin and did a little hands on craftivity to accompany the book.  Get those kinder fingers cutting!


{seed, sprout, plant, flower, pumpkin, ripe pumpkin}

Sprinkled though out this month we enjoyed playing my Pumpkin Hangman.  A fun way to integrate our letter study curriculum.  The students have to tell me the sound their letter makes before I can put it up.  Each incorrect guess we put up a piece of the pumpkin {1st wrong guess= pumpkin, 2nd wrong guess= piece of the face and so on and so forth}.

 I laminate all pieces and then add velcro so it can be used again and again.  I've had this particular game for the past 3 years! 

The kiddos love to mix it up and pick out their difference faces for the pumpkin.  


We also integrated our pumpkin theme into our math lessons.  I put out Pumpkin BUMPkin  and ROLL a PUMPKIN as math centers for the little ones to enjoy.  They loved them so much they wanted to play them during morning work! 


Next up was exploring the INSIDE of our pumpkins..


We carved our little guy; well, I attempted to carve.  I forgot how hard this was after about 15 years! 


 We examined the "guts" and talked about the pumpkin parts using the above diagram.  Next,  we read the book How Many Seeds in a Pumpkin by Margaret McNamara and made our own guesses. 


 We had everything from 21 to a billion.  We invited our second grade neighbors over to count the number of seeds in each pumpkin.  They were working on skip counting so my littles were in charge of scooping  out the guts and seeds then putting the seeds into piles of 2s, 5s, or 10s.  Perfect counting practice!  

The grand total was 534! 


This picture was taken AFTER a 20 minute cleanup.  My room was a DISASTER and smelled like raw pumpkin for about 48 hours ! 


Lastly, we got to my favorite part of this whole theme... COOKING AND EATING the pumpkins!

WOOO HOOOO!!


Scraping out the insides and roasting the pumpkin (350 degrees for 40 minutes flesh side down and skin on top). 

And..... drumroll please.... 


There wasn't a single crumb left.  It was so delicious!


Boil for 10 minutes in salt water (prevents inner seed burning and makes them crispier), dry then massage with salt and olive oil and toast at 350 degrees for 10 minutes.  We have been snacking on these all week! 

When we were finished we all made a five little pumpkins poem book.  They loved being authors for the first time! 


As a grand finale we ended our pumpkin unit by completing the pumpkin life cycle.  In conjunction with the STUNNING book Pumpkin Jack by Will Hubbell  we brought our pumpkin out to our school's Seed to Table garden and planted him.  My littles can't wait to take next years crop of kindergarteners to pick the pumpkins that will grow.  


Add a comment »

Apple Week

Monday, October 13, 2014

So I am a tad behind here on the apple bandwagon.  Our apple theme was a few weeks ago but I loved it so, so much I wanted to share a few of the highlights... 

This is a beautiful creativity my TA did with the class.  {Shout out to the Tidy Tub which makes craftivities a zillion times easier to clean up!}


Each kiddo traced an apple template on a piece of white construction paper.  Then s/he placed small squares of tissue paper onto the tracer.  Next, s/he lightly covered the tissue paper squares with a mixture of glue and water. 


The finished product!  I always make sure to have a seasonal bulletin board in my classroom.  It's so important for the littles to make connections with the world around them, plus it's just so festive and fun to integrate into our learning/fine motor skills!  The trees remain up all year but the decor around them changes.  


{Truth be told: this board was actually changed over on Friday when I put up our autumn leaf sun-catchers.  Hopefully I will get that post up before Christmas! }

Apple Alphabet Center


Here is one of the centers we did.  Granted this was the 2nd and 3rd week of school, so were focusing on matching uppercase to lowercase letters.  First with all cards facing up, then the challenge round was with the cards facing down!  We played 1/2 of the alphabet at a time.  A-M and N-Z 

Now for the big finale..... Drumroll please...

Apple picking and apple cider making!  

Yes! It's true, at my glorious new school we have our own apple trees and homemade apple cider press.  We enjoyed picking apples with our Upper School buddies and then making delicious, fresh apple cider.  


MMMMM, delicious!


Our spectacular science teacher has her parents travel down each year for this annual tradition.  They bring their own cider press and guide our kinders through the three stations.  1. The "checking station" where we get rid of the rotten apples.  2. The "washing station" {see below} where we clean those tasty apples.  And 3. the "smushing station" where those little apples are pulverized down into the sweet pulpy-blend.  


Lastly, they all took turns going 'round the cider press to squeeze out delicious cider.  


The cider master!


It's October and I am still pinching myself that I work at this amazing school!  Now, raise your cider glasses and CHEERS! 

ps- although we did not make applesauce I read this book with my kinders and LOVED it. We loved it so much we read it 3x! 


Add a comment »

Labels here, labels there, labels, labels everywhere!

Thursday, September 25, 2014

We are  s l o w l y  beginning Writers Workshop this week.  Deep breath in and out.  I am used to a more structured 'brainstorm and write' system of writing but am excited with the flexibility WW allows.


I began with a labeling lesson.  We talked about how labels can help explain something in a picture and how even though it may be hard for us to write words, we are super good at drawing pictures and we can add words to our pictures.


   Please excuse my lame-o anchor chart!! We took turns coming up to the chart to point out items we could label.  Who would have thought this makeshift picture could produce over 30 labels!  (No one believed my 'dog' was a dog, they, in fact, decided it as a cat)

I demo-ed how to label things using post-its.  I sound spelled window, chair and... NOAH! One of my students was super surprised when I stuck a label on his forehead.  Then total pandemonium ensued!  I put bowls of POST-ITS and flair pens out on their desks and let them go to town labeling our classroom.   It.Was.INCREDIBLE.  When the 15 minutes was up, my room was littered with over 60!! labels (I only have 14 littles!!).  Here are some of the highlights...

 3 shelves

SmartBoard

Art Easel
Pete the Cat, Wall

Door

Ball

Poem (courtesy of Ashley over at One Sharp Bunch)


My personal fave.... cubby

As the next lesson in my Writers Workshop, we will do a little review/warm up with ONE post-it each to label and then draw a picture and add some labels to the picture.


Add a comment »